iOSでナビゲーションバーのタイトルのフォントと色を変更する


101

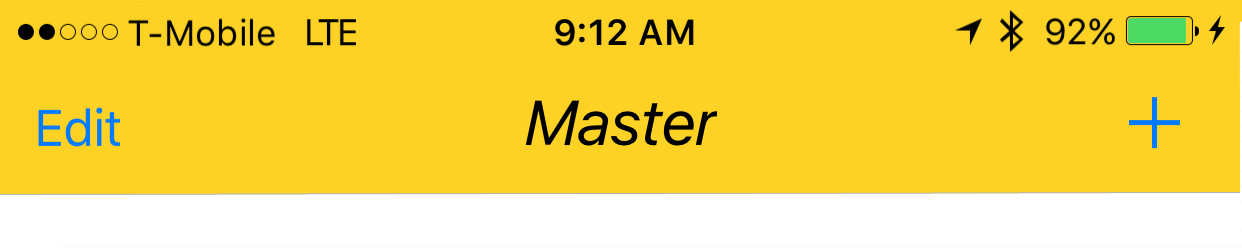
だから私はナビゲーションバーのタイトルフォントを変更する必要があるこのコードを持っていますが、それは行いません

    NSDictionary *attributes = [NSDictionary dictionaryWithObjectsAndKeys:[UIFont
                                                                       fontWithName:_dataManager.optionsSettings.fontString size:14], NSFontAttributeName,
                            [UIColor whiteColor], NSForegroundColorAttributeName, nil];

[[UINavigationBar appearance] setTitleTextAttributes:attributes];

このコードで戻るボタンのフォントを変更しても問題なく機能します。

   //set backbutton font
NSDictionary *normalAttributes = [NSDictionary dictionaryWithObjectsAndKeys:
                                  [UIFont fontWithName:_dataManager.optionsSettings.fontString size:15], NSFontAttributeName,
                                  nil];
[[UIBarButtonItem appearance] setTitleTextAttributes:normalAttributes
                                            forState:UIControlStateNormal];

回答:


251

タイトルのフォント(および色)を変更する正しい方法は次のとおりです。

[self.navigationController.navigationBar setTitleTextAttributes:
 @{NSForegroundColorAttributeName:[UIColor redColor],
NSFontAttributeName:[UIFont fontWithName:@"mplus-1c-regular" size:21]}];

編集:Swift 4.2

self.navigationController?.navigationBar.titleTextAttributes =
[NSAttributedString.Key.foregroundColor: UIColor.red,
 NSAttributedString.Key.font: UIFont(name: "mplus-1c-regular", size: 21)!]

編集:Swift 4

self.navigationController?.navigationBar.titleTextAttributes =
[NSAttributedStringKey.foregroundColor: UIColor.red,
 NSAttributedStringKey.font: UIFont(name: "mplus-1c-regular", size: 21)!]

スウィフト3:

self.navigationController?.navigationBar.titleTextAttributes = 
[NSForegroundColorAttributeName: UIColor.redColor(),
 NSFontAttributeName: UIFont(name: "mplus-1c-regular", size: 21)!]

2
私が試した値に関係なく、サイズは同じままです
Raphael Royer-Rivard

1
はい、フォントが正しく読み込まれていないことに気付きました。それでも理由がわかりません。OpenSans-LightとOpenSans-Regularを同じ方法でインポートしましたが、OpenSans-Lightしか使用できないようです...
Raphael Royer-Rivard

1
Obj-Cコードには閉じ括弧がありません。[self.navigationController.navigationBar setTitleTextAttributes:@ {NSForegroundColorAttributeName:[UIColor redColor]、NSFontAttributeName:[UIFont fontWithName:@ "mplus-1c-regular" size:21]}];
ディランハンド

backBarButtonフォントを変更するためのリンクに移動:stackoverflow.com/a/16538596/5967144
soorej babu

LargeTitle NavBarを使用する場合はどうですか?navigationBar.LargeTitleTextAttributesその点については何も見つかりません。LargeTitleフォントをグローバルに設定する方法を知っていますか?
iKK、

54

他の答えには何も問題はありません。フォントを設定するためのストーリーボードバージョンを共有しています。

1.ナビゲーションコントローラー内のナビゲーションバーを選択します

ナビゲーションバー

2.属性インスペクターでタイトルのフォントを変更する

タイトルフォント

(おそらく、Xcodeが新しいフォントを取得する前に、ナビゲーションバーのバーティントを切り替える必要があります)

注意事項(注意事項)

これがXcode 7.1.1以降で機能することを確認しました。(下のサンプルを参照してください

  1. フォントを有効にする前に、ナビゲーションバーの色合いを切り替える必要があります(Xcodeのバグのようです。フォントをデフォルトに戻すと、フォントが固定されます)。
  2. システムフォントを選択する場合〜サイズが0.0でないことを確認してください(それ以外の場合、新しいフォントは無視されます)

サイズ

  1. 1つのNavBarのみがビュー階層にある場合、これは問題なく動作するようです。同じスタック内のセカンダリNavBarは無視されるようです。(マスターナビゲーションコントローラーのnavBarを表示する場合、他のすべてのカスタムnavBar設定は無視されることに注意してください)。

Gotchas(deux)

これらのいくつかは繰り返されているため、注目に値する可能性が非常に高いです。

  1. ストーリーボードxmlが破損する場合があります。これには、ソースコードモードとしてストーリーボードの構造を確認する必要があります(ストーリーボードファイルを右クリック> [名前を付けて開く...])
  2. 場合によっては、ユーザー定義のランタイム属性に関連付けられているnavigationItemタグが、ビューコントローラータグではなくビュータグのxml子として設定されていました。正しい場合は、タグの間から削除してください。
  3. NavBarティントを切り替えて、カスタムフォントが使用されていることを確認します。
  4. 動的フォントスタイルを使用していない限り、フォントのサイズパラメータを確認する
  5. ビュー階層は設定を上書きします。スタックごとに1つのフォントが可能であるようです。

結果

navbar-italic

サンプル

カスタムフォントの処理

注意〜Code With ChrisのWebサイトから優れたチェックリストが見つかり、サンプルダウンロードプロジェクトを確認できます。

独自のフォントがあり、それをストーリーボードで使用したい場合は、次のSO質問に適切な回答セットがあります。1つの答えはこれらのステップを識別します。

  1. カスタムフォントファイル(.ttf、.ttc)を入手する
  2. フォントファイルをXcodeプロジェクトにインポートする
  3. app-info.plistで、アプリケーションによって提供されるFontsという名前のキーを追加します。これは配列タイプであり、すべてのフォントファイル名を配列に追加します。メモ:ファイル拡張子を含めます。
  4. ストーリーボードのNavigationBarで属性インスペクターに移動し、フォント選択領域の右アイコンボタンをクリックします。ポップアップパネルで、[フォントをカスタム]を選択し、埋め込みフォント名のファミリを選択します。

カスタムフォントの回避策

したがって、XcodeはUINavigationItemのカスタムフォントを処理できるように見えますが、その機能は正しく更新されていません(選択されたフォントは無視されます)。

UINavigationItem

これを回避するには:

1つの方法は、ストーリーボードを使用してコード行を追加することで修正することです。最初に、UIView(UIButton、UILabel、またはその他のUIViewサブクラス)をビューコントローラーに追加します(ナビゲーション項目ではありません... Xcodeは現在、実行を許可していませんそれ)。コントロールを追加した後、ストーリーボードのフォントを変更し、参照をアウトレットとしてビューコントローラーに追加できます。そのビューをUINavigationItem.titleViewに割り当てるだけです。必要に応じて、コードにテキスト名を設定することもできます。報告されたバグ(23600285)。

@IBOutlet var customFontTitleView: UIButton!

//Sometime later...    
self.navigationItem.titleView = customFontTitleView

21

これを試して:

NSDictionary *textAttributes = [NSDictionary dictionaryWithObjectsAndKeys:
                                [UIColor whiteColor],NSForegroundColorAttributeName,
                                [UIColor whiteColor],NSBackgroundColorAttributeName,nil];
self.navigationController.navigationBar.titleTextAttributes = textAttributes;

14

ナビゲーションバーのタイトルを変更するための私のSwiftコード:

let attributes = [NSFontAttributeName : UIFont(name: "Roboto-Medium", size: 16)!, NSForegroundColorAttributeName : UIColor.whiteColor()]
self.navigationController.navigationBar.titleTextAttributes = attributes

バックグラウンドフォントも変更したい場合は、これをAppDelegateに入れます。

let attributes = [NSFontAttributeName : UIFont(name: "Roboto-Medium", size: 16)!, NSForegroundColorAttributeName : UIColor.whiteColor()]
UIBarButtonItem.appearance().setTitleTextAttributes(attributes, forState: UIControlState.Normal)

8

この1行のコードをアプリデリゲートに追加します。フォント、ナビゲーションバーの色をアプリケーション全体で変更します。

UINavigationBar.appearance().titleTextAttributes = [NSAttributedString.Key.foregroundColor: UIColor.white, NSAttributedString.Key.font: UIFont(name: "YOUR FONT NAME", size: 25.0)!]

5

ここにあなたの質問に対する答えがあります:

ビューが読み込まれた後にナビゲーションバーのタイトルが更新されるため、コードを以下のメソッドに移動します。上記のコードをviewDidLoadに追加しようとしても機能しません。viewDidAppearメソッドでは問題なく機能します。

  -(void)viewDidAppear:(BOOL)animated{}

3

誰でもSwift 3バージョンが必要です。redColor()だけに変更されましたred

self.navigationController?.navigationBar.titleTextAttributes =
        [NSForegroundColorAttributeName: UIColor.red,
         NSFontAttributeName: UIFont(name: "{your-font-name}", size: 21)!]

2

リテラルを使用すると、少し読みやすくなります。

self.navigationController.navigationBar.titleTextAttributes = @{
                                                              NSFontAttributeName:[UIFont fontWithName:@"mplus-1c-regular" size:21],
                                                              NSForegroundColorAttributeName: [UIColor whiteColor]
                                                              };

2

NavigationItemのタイトルをプログラムで変更しようとしたときに、ファミリーフォントを見つけることができなかった(多くのことを試したが、正しく実行できない)ため、問題が1つありました。

  1. 最初に、ナビゲーションアイテムの下に1つのビューを中央に追加し、backGroundColorをクリアカラーに設定してnavBarと同じカラーにすることを忘れないでください。

ここに画像の説明を入力してください

  1. 次に、このビューで編集できる1つのラベルを追加します(テキストの色、フォント、サイズなどを設定します)。
  2. ラベルのビュー(中央= 0、末尾= 0、末尾= 0、および先頭= 0)に制約を追加して、ラベルのテキストを中央に配置します

最後に、ドキュメントのアウトラインに次のようなものが必要です。

ここに画像の説明を入力してください

そして、あなたのViewControllerのようなもの:

ここに画像の説明を入力してください

お役に立てれば幸いです。


2

迅速:-

self.navigationController?.navigationBar.titleTextAttributes = [NSAttributedStringKey.foregroundColor: UIColor.white, NSAttributedStringKey.font: UIFont(name:"Love Nature", size: 40)!]

1

これはSwift 4の代替案です(@Joshによる回答済み)。

let titleTextAttributed: [NSAttributedStringKey: Any] = [.foregroundColor: UIColor.red, .font: UIFont(name: "AvenirNext-Regular", size: 20) as Any]
navigationController?.navigationBar.titleTextAttributes = titleTextAttributed

1

iOS 11

ここに画像の説明を入力してください

Objective-C

if (@available(iOS 11.0, *)) {
    self.navigationController.navigationItem.largeTitleDisplayMode =  UINavigationItemLargeTitleDisplayModeAlways;
    self.navigationController.navigationBar.prefersLargeTitles = true;

// Change Color
    self.navigationController.navigationBar.largeTitleTextAttributes = @{NSForegroundColorAttributeName: [UIColor whiteColor]};

} else {
    // Fallback on earlier versions
}

1

Objective-Cがフォントと色を設定する場合

- (void)_setup {
    NSDictionary *barButtonTitleAttributes = @{
                                               NSForegroundColorAttributeName : [UIColor whiteColor],
                                               NSFontAttributeName :[UIFont fontWithName:@"Lato-Regular" size:15.0]
                                               };
    [self.navigationBar setTitleTextAttributes:barButtonTitleAttributes];

}

0

Swift 4 forの答えは次のとおりです。

    let textAttributes:[String:Any]? = [NSAttributedStringKey.foregroundColor.rawValue:UIColor.blue, NSAttributedStringKey.font.rawValue:UIFont(name:"Avenir Next", size:20)!]
    navigationController?.navigationBar.titleTextAttributes = textAttributes

0

コンパイルエラーを回避するために、キーのRaw値を追加することを忘れないでください。

    let textAttributes:[NSAttributedStringKey: Any] = [NSAttributedStringKey(rawValue: NSAttributedStringKey.foregroundColor.rawValue):UIColor.blue, NSAttributedStringKey(rawValue: NSAttributedStringKey.font.rawValue):UIFont(name:"OpenSans", size: 17)!]
    navigationController?.navigationBar.titleTextAttributes = textAttributes

0

Swift 4.2

self.navigationController?.navigationBar.titleTextAttributes =
        [NSAttributedString.Key.foregroundColor: UIColor.white,
         NSAttributedString.Key.font: UIFont(name: "LemonMilklight", size: 21)!]

0

この拡張機能を追加

extension UINavigationBar {
    func changeFont() {
        self.titleTextAttributes = [NSAttributedStringKey.foregroundColor: UIColor.white, NSAttributedStringKey.font: UIFont(name:"Poppins-Medium", size: 17)!]
    }
}

viewDidLoad()に次の行を追加します

self.navigationController?.navigationBar.changeFont()

-1

Swift 3.0での作業タイトルの色を変更するには、次のようにtitleTextAttributesを追加する必要があります

        let textAttributes = [NSForegroundColorAttributeName:UIColor.white]
        self.navigationController.navigationBar.titleTextAttributes = textAttributes

For changing navigationBar background color you can use this
        self.navigationController.navigationBar.barTintColor = UIColor.white

For changing navigationBar back title and back arrow color you can use this
       self.navigationController.navigationBar.tintColor = UIColor.white
弊社のサイトを使用することにより、あなたは弊社のクッキーポリシーおよびプライバシーポリシーを読み、理解したものとみなされます。
Licensed under cc by-sa 3.0 with attribution required.